

Are you tired of staring at carpet seams in your living room? Don’t let it ruin the overall aesthetic of your space any longer! A damaged carpet seam not only looks unappealing but can also pose a tripping hazard for you and your loved ones
But fear not! Repairing a carpet seam is easier than you think, and in this blog post, we will guide you through the step-by-step process of fixing it like a pro.
This skill will save you money and enhance the look and feel of your living space. So, let’s get started and say goodbye to that pesky carpet seam once and for all.
Tools and materials
Gathering the necessary tools and materials is an essential step in repairing a carpet seam.
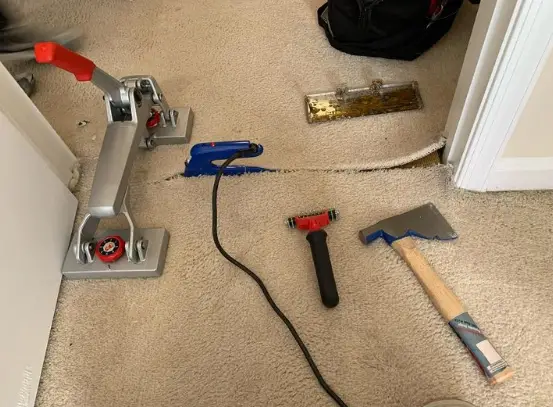
Having the right tools and materials will make the process easier and more effective, ensuring that the seam is repaired correctly. Here is a list of tools and materials needed to repair a carpet seam, along with an explanation of their purpose:
1. Carpet knife or scissors
You will need a sharp carpet knife or scissors to cut the seam along a straight line. Using a dull knife or scissors can result in jagged edges and uneven seams.
2. Straight edge
A straight edge is used to guide your carpet knife or scissors when cutting the seam. It ensures a straight cut and a seamless join.
3. Adhesive
Choose an adhesive that is specifically designed for carpet repair. There are many types of adhesives available, including liquid, tape, and glue.
Be sure to select an adhesive that is strong, durable, and appropriate for the type of carpet you have.
4. Seam tape
Seam tape is a specialized tape used to reinforce the carpet seam. It helps to hold the carpet together and prevent it from unraveling.
5. Chalk or pencil
Use chalk or a pencil to mark the carpet where you need to cut the seam. This will ensure that you make a straight cut and that the seam lines up properly.
6. Tape measure
A tape measure will help you to measure the length of the seam accurately, ensuring that you have enough adhesive and seam tape to complete the repair.
7. Vacuum cleaner
Before beginning the repair, vacuum the area around the seam to remove any debris or dirt. This will ensure that the area is clean and free of any obstacles that may interfere with the repair process.
Prepare The area
Preparing the area before repairing a carpet seam is crucial to ensure that the repair process goes smoothly and the outcome is successful.
Here are two important steps to take when preparing the area for repairing a carpet seam:
1. Clearing the area of debris and furniture
Before starting the repair process, clear the area around the seam of any furniture or other obstacles.
Move any chairs, tables, or other items that may be in the way, and make sure there is enough space to work comfortably.
This will allow you to move freely and avoid any accidental damage to your furniture or other belongings during the repair.
2. Cleaning the carpet around the seam
The area around the seam should be cleaned thoroughly before starting the repair process.
This ensures that there is no debris or dirt that may interfere with the adhesive’s bonding capabilities.
Use a vacuum cleaner to remove any dirt or debris from the area around the seam. If the area is heavily soiled, you may need to use a carpet cleaning solution to remove any stains or spots.
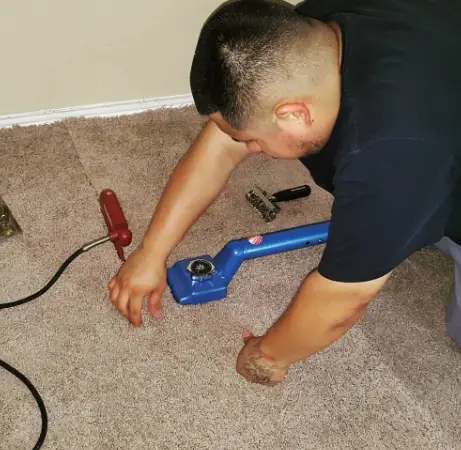
Cut The Seam
Cutting the seam is the next step in repairing a carpet seam. This process involves cutting the carpet along a straight line and removing any excess fibers that may interfere with the adhesive bond.
Here are two important steps to follow when cutting the carpet
1. Cutting the seam along a straight line
Use a straight edge and chalk or pencil to mark a straight line along the seam. This line will serve as a guide for cutting the carpet. Use a sharp carpet knife or scissors to cut along the line.
Make sure to cut through both layers of the carpet to ensure a clean and precise cut. Cutting along a straight line is crucial to ensuring that the carpet will join seamlessly and look as good as new.
2. Removing excess carpet fibers
After cutting the seam, you may notice some loose fibers or frayed edges.
Use a pair of scissors to carefully trim any excess fibers, making sure to leave enough to ensure a clean join.
Removing excess fibers will ensure that the adhesive has a clean surface to bond to and will prevent any unsightly bumps or bulges in the repaired seam.
Apply adhesive
Applying adhesive is a critical step in repairing a carpet seam. The adhesive ensures that the seam remains bonded and stable over time.
Here are two important steps to follow when applying adhesive:
1. Choosing the right adhesive for the job
It is important to choose the right adhesive for the job to ensure a strong and durable bond.
There are many types of adhesives available, including liquid, tape, and glue. Choose an adhesive that is designed for carpet repair and appropriate for the type of carpet you have.
2. Applying the adhesive evenly
Once you have chosen the right adhesive, it is important to apply it evenly to ensure a strong bond.
Apply a small amount of adhesive along the cut edges of the carpet seam, using a brush or spatula to spread it evenly.
Make sure to apply the adhesive to both sides of the seam, ensuring that there is enough adhesive to create a strong bond. Be careful not to apply too much adhesive, as this can cause the carpet to bulge or ripple.
Allowing the adhesive To Dry
Allowing the adhesive to dry is a critical step in repairing a carpet seam. It ensures that the adhesive fully bonds to the carpet fibers, creating a strong and durable seam. Here are two important steps to follow when allowing the adhesive to dry:
1. How long to wait for the adhesive to dry
The drying time for adhesive varies depending on the type of adhesive used and the environmental conditions, such as temperature and humidity.
Typically, the adhesive will need to dry for 24 to 48 hours before it is fully cured.
2. Tips for keeping the area clear while waiting for the adhesive to dry
While waiting for the adhesive to dry, it is important to keep the area clear to avoid disturbing the repair.
Place a piece of cardboard or plastic over the repaired seam to protect it from foot traffic or accidental spills. Avoid walking on the repaired area or placing furniture on it until the adhesive has fully cured. You may also want to open windows or use a fan to improve air circulation and speed up the drying process.
Trimming excess carpet fibers
Trimming excess carpet fibers is a crucial final step in repairing a carpet seam. This step ensures that the seam looks seamless and blends in with the rest of the carpet.
Here are two important steps to follow when trimming excess fibers:
1. Trimming any excess carpet fibers to create a seamless look
After the adhesive has fully cured, use a sharp pair of scissors to carefully trim any excess carpet fibers that may be sticking up around the seam.
Be sure to trim the fibers as close to the seam as possible to create a seamless look. Avoid cutting into the seam or the surrounding carpet fibers.
2. Blending the seam into the rest of the carpet
Once you have trimmed the excess fibers, use a carpet brush or your fingers to blend the repaired seam into the surrounding carpet fibers. Brush the fibers in different directions to ensure that the seam blends seamlessly into the rest of the carpet. If necessary, you can also use a steam iron or a damp cloth to help the carpet fibers blend together.
Final Check and Clean up
Here are two important steps to take when preparing the area for repairing a carpet seam:
1. Clearing the area of debris and furniture
Before starting the repair process, it’s important to clear the area around the seam of any furniture or other obstacles.
Move any chairs, tables, or other items that may be in the way, and make sure there is enough space to work comfortably. This will allow you to move freely and avoid any accidental damage to your furniture or other belongings during the repair.
2. Cleaning the carpet around the seam
The area around the seam should be cleaned thoroughly before starting the repair process.
This ensures that there is no debris or dirt that may interfere with the adhesive’s bonding capabilities.
Use a vacuum cleaner to remove any dirt or debris from the area around the seam. If the area is heavily soiled, you may need to use a carpet cleaning solution to remove any stains or spots.
SEECan You Paint Carpet? Benefits and Drawbacks
Conclusion
By taking the time to gather the necessary tools, preparing the area, cutting the seam, applying adhesive, allowing the adhesive to dry, trimming excess fibers, and performing a final check and clean up, you can ensure that your carpet seam repair will look seamless and blend in with the rest of the carpet.
Remember that carpet seam repair can be challenging, and it’s essential to take your time and work carefully to avoid any mistakes or uneven repairs. If you’re unsure about any step or have any questions, it’s always best to consult with a professional carpet installer.
With a little patience and attention to detail, repairing a carpet seam can save you time and money in the long run.
By following the steps outlined in this blog post, you can repair your carpet seam and enjoy your beautiful and functional carpet for years to come.
